Shortcut Procedures for Internet Explorer Users
Basic Concepts
There isn’t anything complicated about any of these procedures. All they amount to is copying and opening files for different purposes. It’s so easy that if you do it one time you’ll know how to do it forever.
Downloading files from a website and then opening them isn’t hard at all to do, but we’re going to assume in these instructions that you know nothing about your computer. There are usually about 10 different ways to get anything done on a computer, which is one of the reasons computers sometimes seem difficult to learn to use. However, these instructions are just going to tell you one way, and not necessarily the fastest way, but the easiest way to describe. Hopefully, some day, you’ll look back on these instructions and laugh at their simplicity, but for now we just want to get the job done.
Before you begin, I suggest you use your browser’s print button to print these instructions so that you will have them available on the desk as you go through the steps.
Downloading is the process of copying a file from a website to your computer, and the process is made easy because the website will “send” you the file when you select the designated link. All you have to do is direct it to where you want it to be saved on your computer.
You can download and open all kinds of files, including…
- Installation files that install programs. Installation files are self-contained programs that open themselves without needing another program. Installation files have a “.exe” file extension.
- Excel files that are Microsoft Excel spreadsheet files that usually contain forms that can be opened, edited, and printed with Microsoft Excel. Excel files have a “.xls” file extension.
- PDF files that are printed documents and manuals in a format that can be viewed and printed with Acrobat Reader. PDF files can be identified by their “.pdf” file extension.
If you are using Internet Explorer as your browser, you have some additional options, including the ability to…
- Install a program file directly from the website, bypassing the step of downloading the Installation File and then running the Installation File from your hard disc. Essentially, this allows you to install a program in one step instead of two steps. What Internet Explorer does in this situation is automatically download the installation File to a temporary folder, then automatically launch the Installation Program for you, after which is erases the temporary download.
- Open an Excel file directly in the browser, bypassing the step of downloading the Excel file and then opening it in Microsoft Excel. This is helpful if you want to view the Excel file (usually a form) BEFORE actually downloading it for permanent use. What Internet Explorer does is open the Excel file directly from the website in sort of a miniature version of Excel that is built into Internet Explorer, which allows you open and view Excel files directly.
If you are using Netscape Navigator, Netscape Communicator, or some other browser, you cannot install programs or view Excel files directly from a website, which means you will have to download the files to your hard drive first before you can use them. This isn’t a problem, it just means you need to follow the appropriate instructions and download the files first.
Viewing File Extensions
Discussion
File Extensions are the “dot” followed by three letters at the end of every file name. Some examples of file names with their file extensions are:
- SWinstall.exe
- Confirmation of Instructions.xls
- SpecWriter Manual.pdf
- Jones Construction.qbw
File extensions can be very helpful in determining the type of file or what program a file is associated with. For example:
- An “.exe” file is a program file. (exe = Executable)
- An “.xls” file is an Excel file. (xls = Excel Spreadsheet)
- A “.pdf” file is an Acrobat Reader file. (pdf = Portable Document Format)
- A “.qbw” file is a QuickBooks Pro data file. (qbw = QuickBooks Windows)
Knowing these simple file extensions can greatly improve your efficiency when downloading and opening files from the website simply because you can ascertain instantly exactly what the file is for simply by looking at the file extension.
Unfortunately, for no explicable reason, Microsoft has chosen to turn off the viewing of the file extensions in the factory installation of Windows. The only possible reason for doing this is that they believe that the average person might accidently change a file extension for a file, which will render the file useless. Of course, you can’t accidentally change a file extension, you can only change it by deliberately activating the “rename” command and then actually entering new letters. Even if you did change a file extension, you can always change it back again.
Personally, I don’t see the problem with having the file extensions visible, and I do see a tremendous advantages in being able to see them.
How can you determine if your version of Windows is set to view the file extensions? It’s simple:
- Double-click the “My Computer Icon.
- Double-click the Drive C icon
- Scroll down to the bottom of the window where the should be some file icons visible.
- If you can see the file extensions, then they’re set to be visible. If all you see is file names, but no “.xyz” (or any other three letters), then your Windows program is set to hide the file extensions.
Fortunately, you can change your Windows setting to reveal the file extensions quite easily, as follows:
- On the Windows Desktop, double-click the “My Computer” icon.
- Double-click the “Drive C” icon.
- On the menu, select “View”, then “Folder Options”
- On the Folder Options dialog box, select the tab labeled “View”.
- On the list of options in the window, under “Files and Folders”, remove the check next to the options titled “Hide file extensions for known file types”.
- Select the button labeled “Like Current Folder”. (This will set all your folders to the same setting)
- Select “OK”.
That’s all there is to it! From now on, in the folders view or when you are using Windows Explorer to perform your computer housekeeping tasks, the file extensions will be visible. Remember, the file extensions are always there, all you did was set Windows to allow you to see them.
If you would like to see graphically illustrated version of these instructions, please click here.
Creating a Download Folder
Discussion
The Download folder is a folder on your computer into which you are going to download files to. The term “Download Folder” simply refers to ANY folder on your hard disc that you care to send (download) file to. In fact, there is no official “Download Folder” simply because you can download files into ANY folder you wish, and can in fact you can download website files into different folders as you may determine during each download. It doesn’t even need to be called named the “Download Folder” simply because any folder will do.
Nevertheless, to keep things simple here, we are going to create a folder that we will name the “Downloads”, and all of our instructions will assume that you are going to use this folder to store your downloads. This Downloads folder will be created on your Windows Desktop, which means that there will be an icon on your desktop that will open the Downloads folder, and thus make it easier for you to find the downloaded files after you have downloaded them.
Step 1
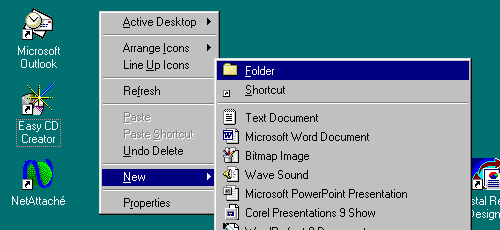
First, close all programs and get to the standard Windows Desktop, which is the screen with all the program icons that you see when you first turn on your computer. Move the mouse pointer anywhere on the screen somewhere not directly on top of an existing icon, then click the RIGHT mouse button, which will open a menu in the middle of the screen as shown below. Next, select the “New” command, which opens a “Fly-out” menu to the right, then select “Folder”.
Step 2
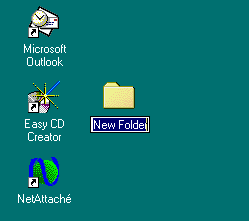
After you select “Folder” as described above, the menus will close and you will have a new folder on the desktop with the name “New Folder” in blue highlight as shown below.
Step 3
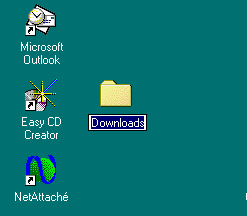
When the “New Folder” appears, you will be in the edit mode, which means you can immediately enter a new name for the folder. Enter the name “Downloads”, then press the “Enter” key to record the new folder name.
Step 4
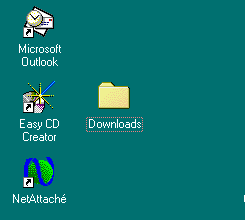
Congratulations, you have successfully created a download folder on your desktop as illustrated below.
Downloading Files to your Hard Disc
Discussion
In some situations, you may wish to actually download a file to your hard disc and then open the file separately. Some examples of situations where this would be the preferred strategy are:
- You are using Netscape Navigator.
- You want to keep a copy of the file.
- You want to send the file to a colleague.
- You want to copy the file onto a floppy disc so you can
copy it to another computer that doesn’t have Internet access.
Remember: The PowerTools Software website contains three different types of files you can download and open, including…
- Installation files that install programs. Installation files are self-contained programs that open themselves without needing another program. Installation files have a “.exe” file extension.
- Excel files that are Microsoft Excel spreadsheet files that usually contain forms that can be opened, edited, and printed with Microsoft Excel. Excel files have a “.xls” file extension.
- PDF files that are printed documents and manuals in a format that can be viewed and printed with Acrobat Reader. PDF files can be identified by their “.pdf” file extension.
The procedure for downloading these different types of files is IDENTICAL. The only difference is what you do with the files AFTER they are downloaded.
To download files from the website, you must first have a designated Downloads folder. If you do not have a designated Downloads folder, please follow the procedures above to create a Downloads folder BEFORE beginning this procedure.
Step 1
First, go to the Download page of the PowerTools website and select the “download” link adjacent to the program or file you wish to download.
Step 2
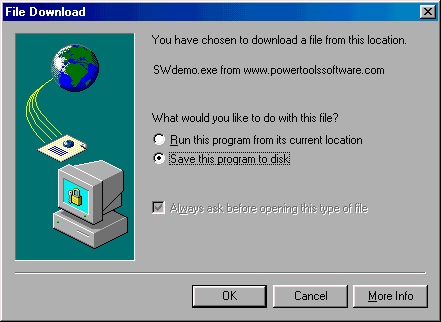
After you select the download link, this dialog box will open. As you can observe, the file we have selected to install is SWdemo.exe, which is the SpecWriter Demo program, and it is being downloaded from the PowerTools website, but you already knew that. Select the option “Save this program to disk”, then select “OK”.
Step 3
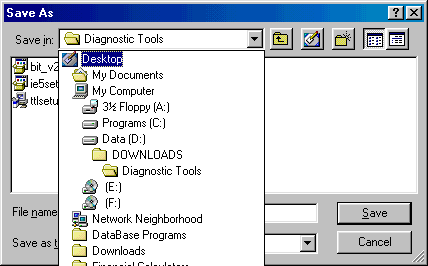
After you select OK, this dialog box will open asking you to select where in your computer you want to download the Installation file to. We know already that we want to save it to the download folder we created on the desktop. It doesn’t matter what folder is already selected. As shown below, select the pull-down window at the top of the dialog box next to “Save in”, and then select “Desktop” from the pull down list.
Step 4
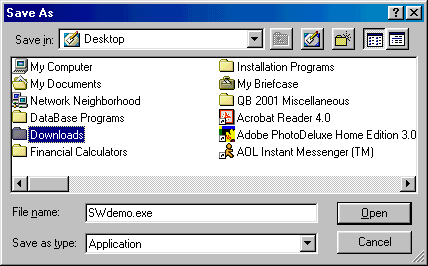
Once you have selected the Desktop, the window in the dialog box will display all the folders on your desktop, but of course you want to select the folder named Downloads. Double-click the Downloads folder, and it will appear in the “Save-in” window.
Step 5
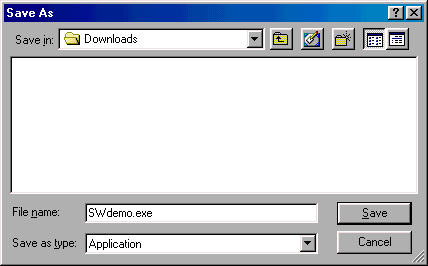
If you’ve previously downloaded files into to the Downloads folder, their names will be displayed in the dialog box, otherwise it will be empty as viewed below. Either way, select the “Save” button to begin the download process.
Step 6
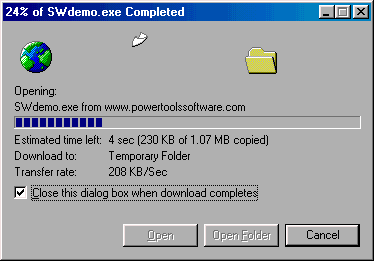
When the download begins, you will see this dialog box with the progress meter indicating the speed of the download. You can also observe the time remaining in the download, the transfer rate, and that the installation file (SWdemo.exe) is being downloaded into the Downloads folder on your Desktop.
Installing a Program from a
Downloaded File on your Hard Disc
Discussion
Many people don’t realize that after they have downloaded an Installation File, they must then run the Installation File to actually install the software. The Installation File contains an Installation Program that installs the software program, as well as the program itself in a compressed format. Therefor, the next step after downloading the Installation File is to run the Installation File, which will launch the installation program that will actually install the PowerTools program onto your computer.
Step 1
Once you have downloaded the Installation File, close Internet Explorer.
Step 2
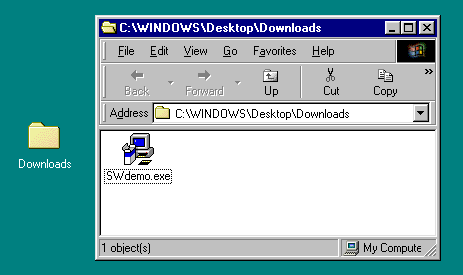
Finding and launching the Installation file is easy. On your Desktop, simply double-click the Downloads folder, which will open a window displaying the contents of the Download folder.
Step 3
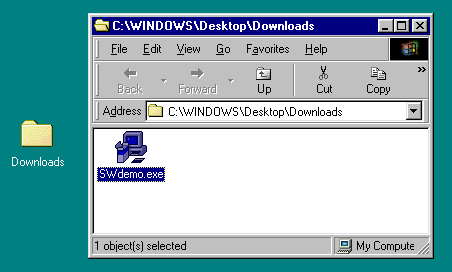
Double-click the Installation file you have just downloaded. In this case, the file we downloaded was called SWDemo.exe., so double-clicking it will launch the Installation program for the SpecWriter Demo program.
Step 4
The Installation Program will take you through the few steps to install the PowerTools Program onto your computer. Just follow the prompts, the Installation Program will essentially do all the work for you. We suggest that you accept the default settings suggested by the Installation Program unless you have a compelling reason to make changes.
Viewing Manuals & Documents in
PDF Format on your Hard Disc
Discussion
Many of our manuals, guides and charts are available as PDF files, which allows you to view, search, and print them with great ease. PDF is a universal file format for printed documents that we create using a program called Acrobat, but that’s not really important to you. What is important is that PDF documents can be opened, viewed, searched and printed using a FREE program called Acrobat Reader.
Acrobat Reader can be obtained from many places, included by download from the Adobe website and the Downloads Page of the PowerTools website. After you download and install Acrobat Reader, you may use it to open, view, search and print any PDF document, which are easy to recognize because they have the “.pdf” file extension.
To open a downloaded document in Acrobat Reader, you may…
- Open Acrobat Reader, then open the desired file.
- Open the PowerTools Manuals icon on your desktop, then double-click the desired document.
Installing Programs directly from the Website
NOTE: This procedure is for Internet Explorer users only.
Discussion
If you are using Internet Explorer, you can install the software demos and software programs directly from the download page of this website. This is the easiest method for installing our software. The procedure is short and simple, and achieves the exact same results as installing the software from a CD.
Step 1 Select the Program to Install
On the Download Page, simply select the “download” link adjacent to the program you wish to install.
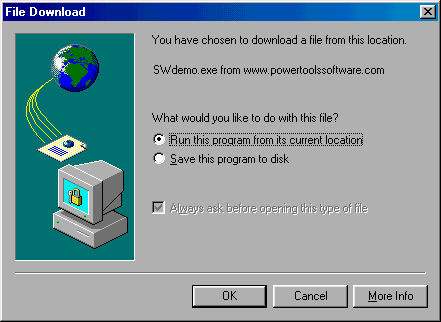
Step 2 Select “Run this program from it’s current location”, then select OK
When you select the download link, this dialog box will open. As you can observe, the file we have selected to install is SWdemo.exe, which is the SpecWriter Demo program, and it is being downloaded from the PowerTools website, but you already knew that. Select the option “Run this program from it’s current location”, then select “OK”.
Step 3 Internet Explorer will download the Installation file as you watch.
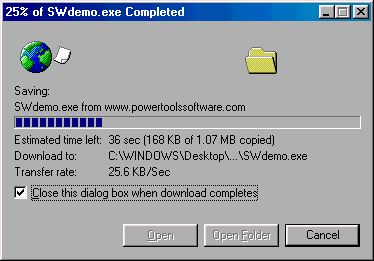
When the download begins, you will see this dialog box with the progress meter indicating the speed of the download. You can also observe the time remaining in the download, the transfer rate, and that the installation file (SWdemo.exe) is being downloaded into a “Temporary Folder”.
Step 4 Select “Yes” to the Security message.
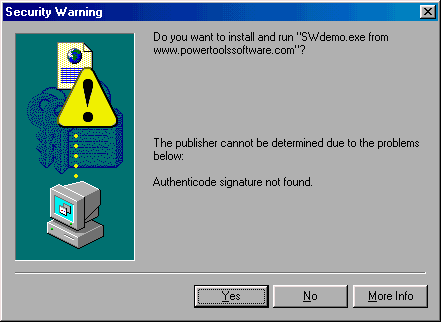
After the download is complete, and before launching the actual Installation program, Internet Explorer will check the file for an electronic signature known as an “Authenticode Signature”, which is used by large software publishers to verify the authenticity of their programs and protect you from viruses contained in downloaded files from suspect sources. You can select “More Info” if you want to learn more.
We do not subscribe to the Authenticode system, so Internet Explorer will present this Security Warning and asks you if you want to continue to install the program. Select “Yes” to continue. Please don’t worry about getting a computer virus from our files, they are completely clean.
Step 5 Your Internet Explorer will launch the installation program.
Once you select “Yes” to the security message, Internet Explorer will launch the Installation Program and install the software.