Discussion
We have carefully designed our web pages to look great when printed. All you need to do to get great looking printed versions of our guides, references and manuals is follow just a couple of procedures.
Use Internet Explorer
We are not devotees of Microsoft, and we don’t particularly care for Internet Explorer as a browser, but we can’t ignore the fact that almost everyone has it on their computer. Therefor, we decided to design our webpages to look their best on Internet Explorer, and it does make a difference, especially when you are talking about precision printing layouts. So, if you are using another browser such as Netscape Navigator, we suggest you close it and open up our site with Internet Explorer instead.
We also suggest you use the latest version of Internet Explorer, which was released in late 2000 and is the first version with the print preview function. This is especially helpful to preview your documents before actually printing them.
If you don’t have Internet Explorer, or if you don’t have the latest version, you can get it FOR FREE from Microsoft’s website. Use the icon link on the left side menu bar of our webpages or go to the Internet Explorer Home Page. The process is effortless, and you don’t even need to download the file, just select “Run this program from its current location” and the program will install itself.
Setup the Page
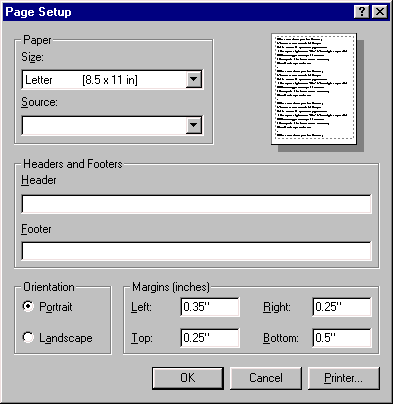
Setting up the page is done in Internet Explorer by using File | Page Setup, or in the preview mode by clicking the small icon directly to the right of the Print command on the menu bar. The Setup for our documents requires erasing any page headers and footers, and setting the page margins as illustrated below.
The headers, footers and margin settings ARE EXTREMELY IMPORTANT. Every document has been designed to fit a standard 8 -1/2 x 11 inch page with specific margins. Internet Browsers do not incorporate page break functions, which means we cannot force a page break in a page. Instead, we must design the webpages to fill printed pages of known sizes. If the margins are not set correctly, and the headers and footers are not removed, the page designs will not work.
The Page Settings are as follows:
| Header | Leave Blank or Delete any entries |
| Footer | Leave Blank or Delete any entries |
| Left margin | .35″ |
| Right margin | .25″ |
| Top margin | .25″ |
| Bottom margin | .5″ |
Here how the Page Setup Dialog box appears when you are finished.

Set Internet Explorer Printing Options
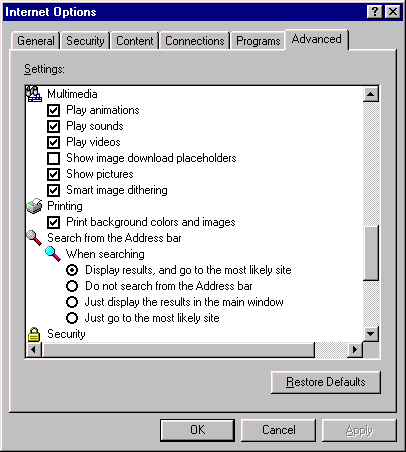
Before you start printing, there is just one other Internet Explorer option to be set. It’s a somewhat obscure setting that determines if Internet Explorer prints the background colors when it prints a page. Of course, we need to print the background colors because all of our page headers have background colors with white lettering, so if this setting is turned off, all you printed pages will be missing their page headers.
We to specifically bring this option to your attention because it’s turned off as the default setting when you first install Internet explorer, so it’s important that you take 10 seconds to turn it on. The procedure is as follows:
- Start Internet Explorer
- From the Internet Explorer menu, select Tools, then select Internet Options, which will open the Internet Options dialog box.
- Select the last tab on the end titled Advanced.
- Scroll approximately 3/4 of the way down the page until you get to the Printing Options.
- The 1st option under the Printing Options is Print background colors and images. It will probably be unchecked.
- Use the mouse pointer to Check this box, then select OK to close the dialog box.

- From this point on, the setting will remain as set unless you specifically return to the dialog box and change it again, although it’s difficult to think of a reason why you would want to change it.